Here is my first go at this planner. I decided to do a Christmas one for myself and knew it would come in handy for all the bits and pieces of paper I write things on, stuff in my pocketbook and then find months later.
I used 4 Christmas scrapbook papers and alternated them throughout the project. This is not done yet, but is 75% completed. Here is the front.

I used a lot of these little holiday chipboard pieces that I picked up in a box from Michaels {37 pieces for $5.99 and I had a coupon}.
Here is the inside {or what it looks like opened} with the pockets.


This Christmas one was practice for this one below.

Same concept, but with baby themed scrapbook paper and stickers/embellishments. The scrapbook paper is Mod Podged on to the manila folder and once dried I added the stickers and embellishments. I also took some colored card stock and added titles to each folder section.
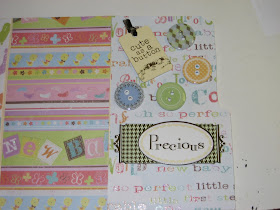
Here it is opened but you are looking at what is the back side. The one section with the "Precious" and "Cute as a button" embellishments is what becomes the cover.

This is the other end of that same back side.
Here is more of a close-up of the inside. This paper has so much going on, I probably didn't even need the added embellishments!


I just thought this was so cute!
And here it is closed, with a yellow ribbon added to tie it shut. I glued my two far ends down with a few dots of hot glue {so nothing would slip out the sides}. I loosely tied the ribbon on before deciding on where to add a dab of glue to the back to hold that in place.


those are awesome!! I love how you alternated the papers, great idea! and the quote on the front of the christmas planner is perfect!
ReplyDeleteCute idea! And congrats on your first grandbaby! How exciting. Mmmmm....babies are such a gift. Enjoy!
ReplyDeleteThis is a great project. Yours turned out great. Thanks for the links to the tutorials.
ReplyDeleteAnd am I to gather that you are going to be a Grandma!!! Congrats!!! That is very exciting news!
Jane
Cool idea - gives me something to do with the piles of scrapbook paper wasting away upstairs....
ReplyDeleteAnd congratulations!!!!!!!!!!!!!!!!!!
Adorable...but why are you posting at 5 a.m.? HA! I've been thinking of some baby things to make too although I already said I'm going to be the practical aunt and get her all of the stuff she's going to need for those late nights i.e. diapers, formula, diapers, mattress pads, diapers - you see where I'm going with this...
ReplyDeleteThis is completely adorable!
ReplyDeleteGuess who won my giveaway? Email me your mailing information and I will get your package in the mail on Monday. Congratulations!
Kathy,
ReplyDeleteYou are so creative. Now I see why you named your blog Creative Home Expressions! I love the folder with the Thomas Nast image on the cover (2nd photo). Great quote too. Have fun finishing your outside decorating today.
Rosemary
I love your cards - they are so beautiful, they look more like precious paper objects! very
ReplyDeleteinspirering!
What a fab idea!
ReplyDeleteSweet project! I don't dare tap into the wonderful world of scrapbooking stuff. I'd have to quit work! :)
ReplyDeleteThanks for linking up!
FJ Donna
Those turned out cute! Congratulations on your upcoming grandbaby! So exciting!
ReplyDeleteI was with you and with you (looking at the folders)... then you surprised me with the grandma news! Congratulations! @cheapchichome.blogspot.com
ReplyDeleteAwwwwe, so cute. Congrats on your new grandbaby !
ReplyDeleteThese are so cute! Congrats on your future title of grandmother!
ReplyDeleteOh Congratulations!!! How exciting for you all! I'm seeing these cute things popping up all over the blogosphere and it's on my to do list. Yours turned out great :). And I think a tutorial that includes mod-podge in the hair would be perfect for someone like me :).
ReplyDeleteThese are so so cute! I love those Christmas chipboard pieces. May have to get me some too!
ReplyDeleteYay! Those look great - very cute.
ReplyDeleteCONGRATULATIONS!! What an exciting time for your family! I am sure you are so excited!!!
ReplyDeleteCongratulations on being a Grandma! How exciting!
ReplyDeleteThose chipboard pieces from Michael's are really my favorite! Very cute projects!
Manuela
The planners turned out so cute and they are great gift ideas. Congratulations on the new grandbaby!!
ReplyDeleteI laughed when I read your omment....I just do it and some days better than others...and with a lot of HELP.
ReplyDeleteThey both turned out great, but that baby one is absolutely ADORABLE! LOVE it! I'm sure your daughter loves it too. Congratulations - you must be so excited!
ReplyDeleteI wish I crafty like you as that is such a great idea!
ReplyDeleteCongratulations from me also. This really is a magical time of year!
Best wishes,
Natasha.
What a cute idea! thanks for the links to the tutorials. And congrats on becoming a grandma!
ReplyDeleteThat sure is cute-love all the graphics!
ReplyDelete